Faculty Success User Guide
Logging in to Faculty Success
To log in to Faculty Success, navigate to the Faculty Success portal and use the Login to Faculty Success tab. You'll use CAS to authenticate.

Faculty Success Overview
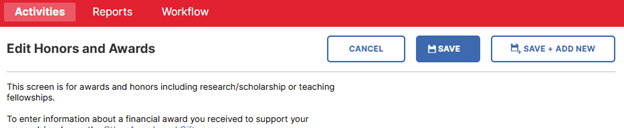
The Activities screen will be your home screen. From this screen you can choose any of the blue links to enter or edit activities.
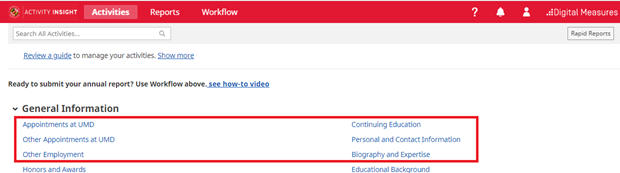
Reports can also be generated through the Reports button in the top navigation bar, or from the Rapid Reports button available on every screen.
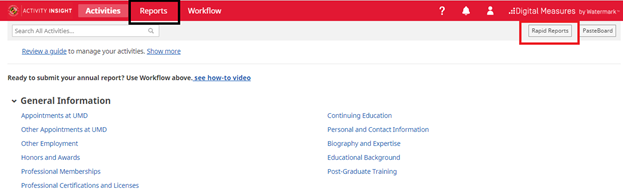
The ? icon in the top navigation bar opens a popup that sends email directly to the Faculty Success team at UMD.
The Search All Activities… input area is a quick way to locate activities on any screen based on free-text search terms.

The guide available for review on the Activities screen is provided by Faculty Success. Use the Show more link to access short videos demonstrating basic actions.
Data Brought In From Other Sources
Faculty Success automatically brings in activity data from other sources, in particular other campus data management systems. The Integrations page on the Faculty Success website lists all of the integrations that are in place. It provides information on the activity screen(s) that are populated by the integration, the range of data that has been brought in, how often the integration runs and how to get changes made, if needed.
Note that in many cases, data populated from a number of campus integrations cannot be edited on the data screen.
Activity Screens: The Basics
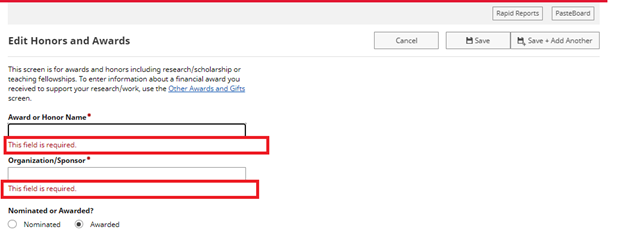
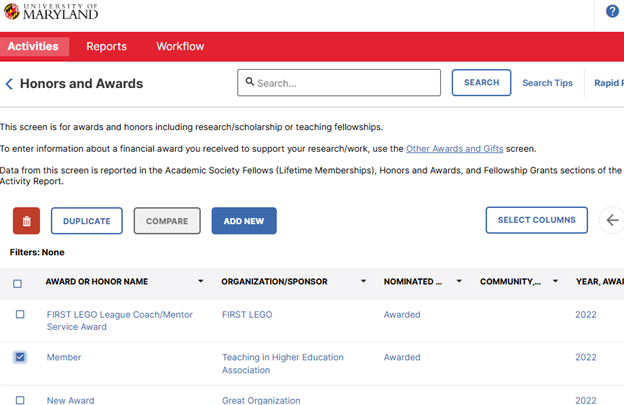
After clicking on an activity screen, you will see a summary screen showing your preloaded or manually entered activities. The screenshot below shows the summary screen for the Honors and Awards activity screen.
Note that you can customize the set of columns presented in the summary table, and that this can be defined uniquely for each activity screen. Use Select Columns to customize your view. If there are more columns than can be displayed on the screen, the left and right arrows will scroll the table view horizontally.
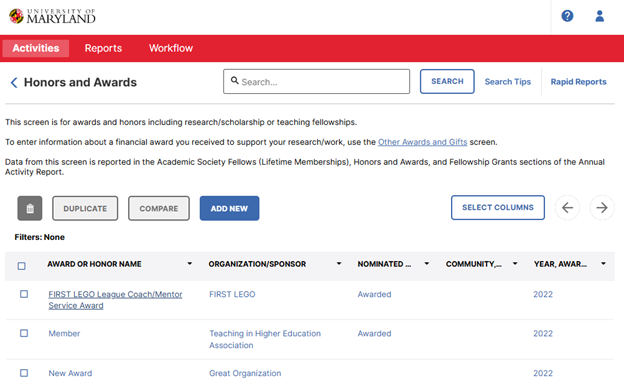
You can click an existing record to edit it, or you can click the Add New to create a new record. Either option will bring you to the Data Entry screen.
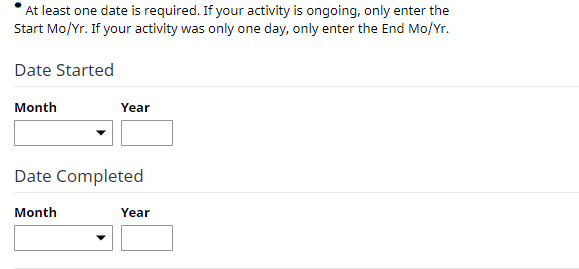
Here you should fill in all of the required fields (denoted by red asterisks) and as many of the optional fields as you would like. The dates are very important for activities and thus are required even not highlighted. Please ensure that you have at least filled out a year of one of the date fields.
Note: you want to fill in your information based on how you want it to look on reports, so be sure to use proper capitalization and punctuation in all fields.
Also keep in mind, these screens are designed to be used by faculty from all disciplines across campus, so some screens may have fields that don't pertain to you. You can either leave those fields blank, or if the field is required, fill it in with the most logical option for your department.
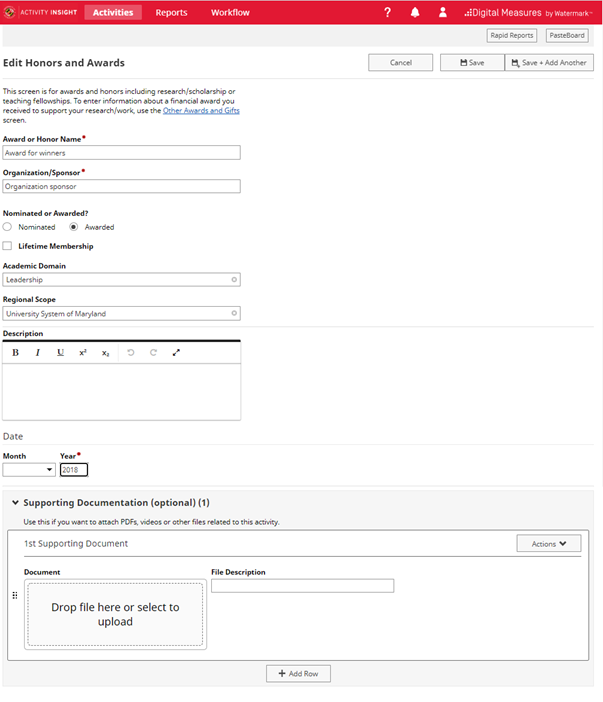
Then save your entry with the Save button at the top of the screen.
If your activity is not saved, please check the activity page for any error messages like "At least one date is required." or "This field is required". These messages appear just below the field with the associated error.
Date Handling in Faculty Success
For reporting to work properly, and for activities to be properly organized on reports, entries must have dates. Most screens will have two spaces for each date, one for month and one for year. The day is very rarely asked for. The date format in Faculty Success is [Month Name] YYYY or [Month Name] DD, YYYY, if the day is included.
For activities that are ongoing, only enter the start date, and leave the end date blank.
If the activity was only one day, or a period of time within the same month, enter the end date and leave the start date blank.
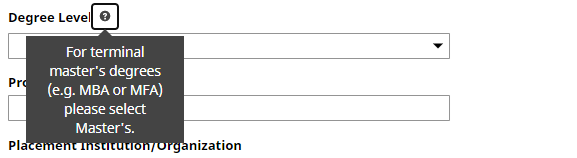
Some fields have additional help available through the ? help icon. In other cases, on-screen instructions provide guidance on how to enter data for the associated field(s).
After filling in all required information, you may choose to add Supporting Documentation. This is completely optional. This is a way to store PDFs, videos or other files related to this activity.
By clicking on the Include in Reports checkbox, your document will be available as a link in custom reports such as the Annual Activity Report.
To add supporting documentation, you can either drop the files or choose an option to upload under Supporting Documentation.
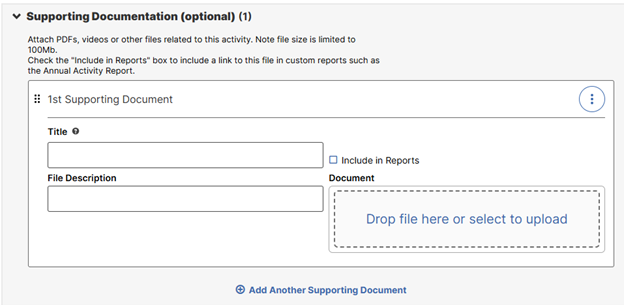
You can add any file type you would like here, as long as it is 100 MB or less. If you would like to add multiple documents, you can click the "+Add" button on the bottom and repeat the file upload process for each additional file.
Important Note: Remember to Save. Click on the Save button after completing all the fields. If your activity is not getting saved, please check the activity page for any error messages like "At least one date is required." or "This field is required". These messages appear just below the field with the associated error.
Curating/Editing an Item
If you need to make changes to any of your pre-loaded activities, or any activities you have entered, you can locate the record you want to edit from the summary screen, and click on the link to view it.

Make any necessary updates to the data entry screen. Remember that all required fields(marked with an asterisk) must be filled in. Once finished click “Save” in the upper right.
Removing an Item
There may be times when you need to delete activities that have been duplicated or added in error. To do this, simply go to the summary screen where the record is located and select the record you want to delete by clicking the checkbox for that record:

Once you have selected the record/records you want to delete, click the trash can icon to delete the record(s).
You will get a popup box asking if you are sure you want to delete the record.
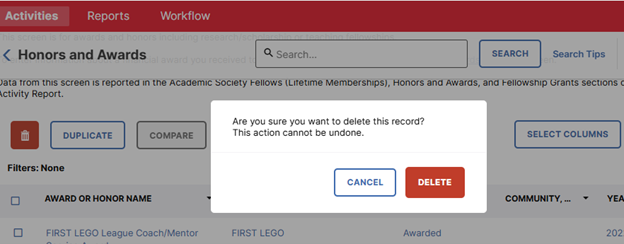
Select Delete. Now you will see that your record has been removed from the summary screen.
Duplicating an Item
Sometimes you can save time adding activities by using the Duplicate feature. In some cases where there are two items that are almost identical, you may find it easier to duplicate one and then slightly modify it, as opposed to creating the second item from scratch.
On the summary screen, choose the activity you want to duplicate by choosing the checkbox on the screen. Then click Duplicate.
Now you can update information for your new record and use Save to create the new activity. You will now see your newly created record in the summary screen.
Sending Bulk Import Request for the Activities
If you have your activities data stored in Excel file, you can review the Bulk Data Import/Update Service page on the Faculty Success website. On that page, you can download an Excel import template for the associated data screen. The columns of the template will correspond to the data fields on that screen and the detailed information on the data format for each column will be provided. The associated Template Column Definitions file provides detailed information on each column of your input file. Follow the instructions and share the completed template with Faculty Success team (dm-help@umd.edu) to perform the data load.
Note: Keep in mind that the timeliness of the data load with this service is dependent on the volume of requests that the Faculty Success team is handling at the time of your request.
Importing Publications
Overview
The Publications screen is for managing a wide variety of research and scholarly publications.
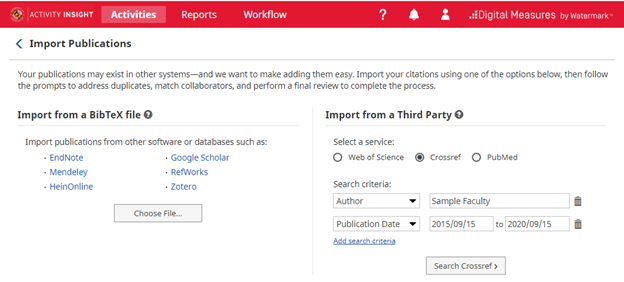
The Import Publications feature can be used to import citations directly from a number of publication databases, as well as through an uploaded BibTeX file generated from other citation managers such as Zotero, EndNote or Mendeley.
Citation Managers are typically used to manage resources that you find while doing research, in anticipation of then citing those references while writing. They can also be used to create personal publication libraries, which can then be exported as BibTeX files to import into Faculty Success.
There is no single foolproof import method to recommend for faculty across the campus. Each option has advantages and disadvantages, depending on your area of research interest and publication activity.
The Import from a Third Party approach, on the right side of the Import Publications screen has the following pros and cons:
- Pros: Data is pulled directly from the selected publication database or researcher profile into Faculty Success
Cons: Each of the integrated publication databases covers different disciplines in varying degrees. For example, PubMed will include a high percentage of public health publications, but very little in social sciences or humanities. None of these resources will work equally well for all faculty members.
The Import from a BibTeX file approach, on the left side of the Import Publications screen has the following pros and cons:
- Pros: More control for faculty as to which publications are included in the BibTeX file, allowing for broader coverage across disciplines.
- Cons:
- Two step process to export BibTeX file and then upload the file into Faculty Success
Some citation managers are limited in regards to which pieces of data are stored and/or exported to the BibTeX file.
For the BibTeX upload, Zotero, EndNote, or Mendeley reference managers can be used to curate personal citations and generate a BibTeX file for uploading. The AnyStyle.io citation parser is another option; copy citations from your CV into AnyStyle.io and choose the BibTex output format.
The Libraries offers a detailed guide on this topic, Preparing for Digital Measures: Creating and Curating a Scholarly Profile.
Importing is Just the First Step...
While these import options greatly ease the burden of entering publication activity, additional manual effort will likely still be needed:
- The Import feature only handles a subset of the possible types of publications that faculty are involved in
- Most of the time, when publications are brought in through the Import feature, key details about the publication will be imported. Depending on the quality of the source data, things like page numbers, special characters, URLs, etc. may not appear correctly, and may need to be corrected manually.
Adding/Updating Collaborators on an Activity
Faculty can add or update other collaborators on an activity within certain sections of the Research, Scholarly, Creative and/or Professional Activities; Sponsored Research; and Service and Outreach categories. Other collaborators may be added/updated to activity in one of the following ways:
- As an Author / Editor to a Publication or Professional/Extension Publication
- As an Author / Presenter to a Presentation
- As an Author / Collaborator to a Significant Work in Public Media
- As a Collaborator to a Creative Scholarship, Center for Research and Creative Scholarship, External, Community or Other Service, Consulting, to a Media Contribution and Outreach Presentation, or Public Engagement, Scholarship or Practice
- As a Reviewer for a Review of Creative Research/Scholarship
- As an Inventor to a Patent, an Invention Disclosure or an Entrepreneurial Technology Transfer
- As an Investigator to a Proposal or Award
To add/update another member of an activity, navigate to the associated activity screen. Then, click on the Add New Item or select a record on the summary screen to drill down into the item detail.
When manually adding an activity to the following screens, the first member will always be you and this is defaulted to show your user name, first and last name as it appears in UMD's system.
- Presentations
- Significant Works in Public Media
- Patents
- Innovations
- Entrepreneurial Technology Transfer
- Other Awards and Gifts
- Other Proposals
- Media Contributions and Outreach Presentations
- Public Engagement, Scholarship and Practice
You have the option to “override” or use a pen name by entering a different first/last name in the data fields of your row. If you have additional authors, skip down below and select the number of “Other Collaborators” rows you wish to add and click on the +Add button.

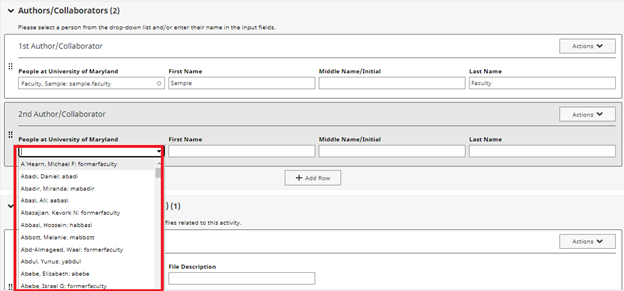
The “Other Collaborator” will be labeled as the “2nd” contributor/author. Their information can be inputted in one of two ways:
- If the other member is UMD faculty, you will be able to find them in the first drop down text box by entering their user name, first name, or last name:
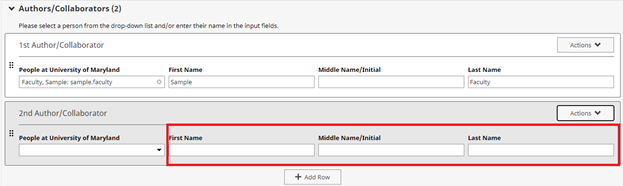
 OR
OR - If the other member is not associated with UMD or if their user name is not listed in the dropdown, enter their information in the text boxes (First Name, Middle Name/Initial, Last Name, Institution/Company, Role) as outlined in the screenshot below. If the collaborator is an organization and not a specific person, enter the organization's name in the Last Name field.
Author/Editor Annotations with Publications
Additional parameters are available with the author/editor data on the Publications screen.
- The corresponding author(s) can be identified. In reports, they will be denoted with a hash mark (#) after their name.
- Students you advised or mentored can be identified. In reports, they will be denoted with the † mark after their name.
- The senior author(s) can be identified. In reports, they will be denoted with the ‡ mark after their name.
- If desired, the Bold My Name checkbox can be selected to ensure that in the generated report, that name will appear in bold within the citation.
Faculty Annual Activity Report Generation
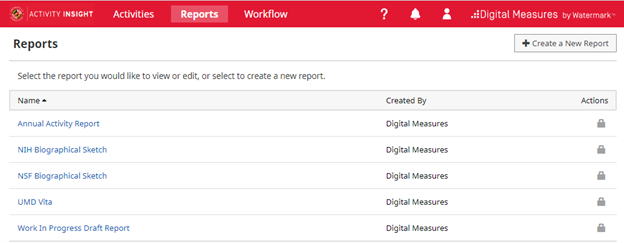
A number of reports in Faculty Success are custom-built for UMD use. There is a custom report available for annual activity reporting.
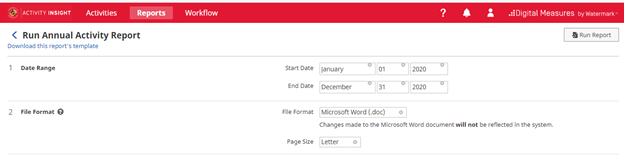
You can access and generate reports using either the Reports tab in the navigation bar or Rapid Reports option. Select the report type to run, the start and end dates and the output file format.
Use the Reports tab
Using Rapid Reports:
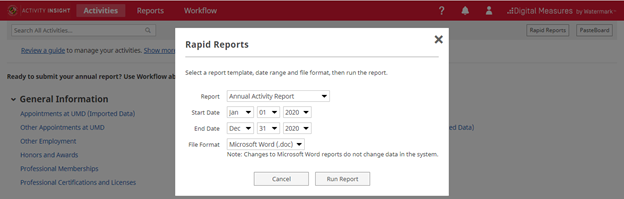
The dates identify a time window; the report will include activities that occurred during this window. The default is the current calendar year.
Reports can be generated in Word, PDF or HTML formats. A few reports can also generate Excel reports.
After clicking Run Report, the report will be generated and downloaded. Based on the browser, you will receive a notice when the download is complete.
Open the document to see the generated report.
Note: Changes made to the downloaded report document will not be reflected in the Faculty Success system. To get correctly formatted reports, you should edit/curate your activities in the Faculty Success system.
For best results in curating your activities for the Annual Activity Report, we recommend use of the Annual Activity Report (Interactive) report tool. This video gives an overview of how to use this report tool.
Troubleshooting Issues with Reports
Here are some common challenges that arise when activities are first included in a report and ways to address them.
- Publications show up in the wrong section of the report: This happens when the Contribution Type field for the publication has not been set, or is set to “Other.” To correct this and ensure your publications are routed to the correct sections of your report, you will need to curate those records.
- Activities from outside of the dates selected show up in the report: Check that dates have been set for the activity. It may be that the activity has a start date but does not have an end date defined; add the correct end date and rerun the report.
Timesavers
Take a look at the following useful features to streamline your Faculty Success experience.
Keyword Search
The Search function is always available at the top of all Faculty Success screens. This is a Keyword Search, which means it will find all activities/items that contain that word in any field and/or file attachments. You can use the search to quickly find items when unsure of which section they may be in.
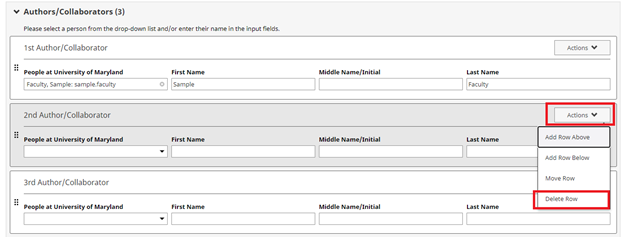
Author Reordering
Publications/Scholarship of Discovery items default the faculty as the 1st Author/Editor. To change the ordering of the authors, use the at the very left of the author section (next to the People at University of Maryland field) to drag and drop the authors in the desired order.

Author Deletion
Remove an author/editor by clicking on the Actions dropdown in the far right corner of the author’s row. Select Delete Row from the options.
Exporting Activity Data
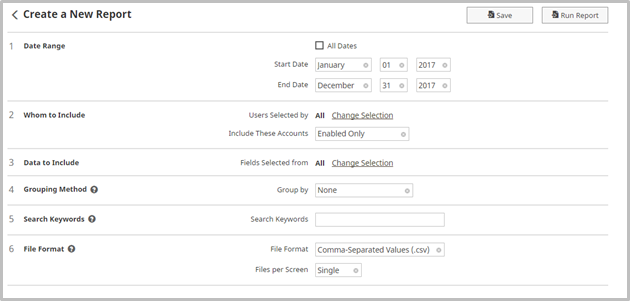
The third style option available from the Create a New Report option on the Reports screen is Export Data. This short video walks you through the configuration of the Export Data report tool outlined below.
The Export Data style lets you set up a new report that:
- Includes only certain users - Option 2: Whom to Include
- Includes only certain data/fields - Option 3: Data to Include. Select from one or more activity screens for inclusion in the report. The default is to include data from all screens.
- Groups the output by department/center, college, tenure home (college or department) or individual - Option 4: Grouping Method
- Yields data for any field that contains a keyword, or a string of keywords with Boolean operators (click on the question mark icon to view the Help document for keyword search) - Option 5: Search Keywords.
Specify the report output; by default the output is CSV. You can change to XML – Option 6: File Format. Additionally, you can specify if the generated report has a single file per screen, or multiple. Most often, the default CSV and Single file options are used.
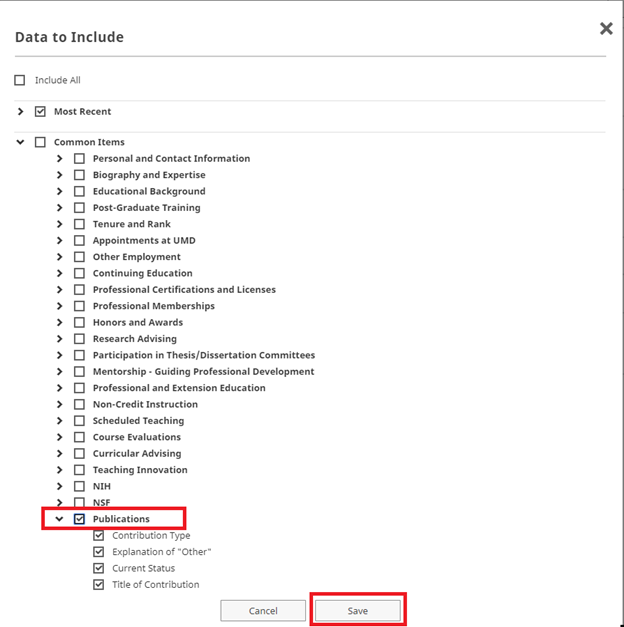
Most frequently, you will want to modify the default for option 3, Data to Include. To make changes use Change Selection to get access to the entire set of screen names.

On the Data to Include popup, uncheck ‘Include All’ and then open the Common Items section.

Select the screen name for the data export and Save.
Once finished setting up the reporting options, click on the Run Report to create the file. Note that the column headings are described in the Faculty Success Configuration Report spreadsheet. Navigate to the particular activity screen's tab in the file and cross reference the column heading's code with the associated label seen on the data screen in the platform.
Guide to the Configuration Report
The Configuration Report is a reference for how the Faculty Success data is currently configured. This is a system-generated Microsoft Excel workbook showing the structure of the Faculty Success instrument, with the details of the input fields for each screen on a separate worksheet.
The Configuration Report provides the following information:
On the "Overview" tab...
- Screen codes.
- Summary Display logic. This refers to the information that displays on the summary screen, or the list of existing records for a given screen.
- Screen access settings.
- Force editable. For screens with access restrictions, are users allowed to create new records?
- Date required. This tells you whether users must enter a significant date before saving the record.
- Primary Key. This is a group of fields that can be used to identify unique records and prevent the creation of duplicates when importing data.
On the screen-specific tabs...
- Data Field Label - what is seen on the data screen in Faculty Success
- Field codes - the internal code for that data field; this appears in column headings in the ad-hoc CSV data export reports
- Display - Text, Numeric, Dropdown, Radio Button. For drop-down displays, pay attention to the Options - this is what the acceptable values are for this field.
- Permission
- Access - some data fields are hidden; others are read-only which is indicated with a Locked access
- Required?
- Default value.
- Minimum/maximum values.
- Options. This pertains to drop-down lists of checkbox lists with predefined options.
- Other attributes. This includes field-specific help text.